

Howdy! If you’re new to fishing and learning how to cast a spinning reel, then this post will come in handy.
The spinning rod and reel are the most basic of fishing equipment (aside from spincast rods and reels). Everyone starts with spinning tackle or will progress to it after spincast tackle.
This makes casting spinning tackle a crucial stepping stone to angling success. It’s one of the most basic skills, but every one of your angling endeavors will depend on it. So make sure to learn it well, and learn it right.
Let’s begin!
Get The Right Gear
Before we go into the steps for casting, make sure you have all of the following equipment:
- Spinning rod and reel that work well with each other and are meant for your target species and fishing style
- Fishing line that’s compatible with your spinning rod and reel
- Leader line connecting main line to lure or bait
- Lure or bait
Don’t worry if you don’t know how to match spinning rods and spinning reels or how to choose the right ones. We’ve got guides for a wide variety of fish and fishing styles for both rods and reels.
Using and Setting Up a Spinning Reel
First off, let’s set your reel up.
- Reel your line in and leave about 6-12 inches of line hanging from the rod tip. Which length exactly depends on a few factors – lure or bait, casting technique, and rod size. However, the difference isn’t very huge, and for new anglers, I’d say comfort matters the most. I’ve found that those just starting out tend to prefer leaving more line as there’s a bit more torque and feels easier to control. Ultimately, go with what’s most comfortable for you.
- Now, continue to turn the reel handle to reel in just a bit more line slowly, keeping an eye on the line roller. Stop when the line roller is aligned with the rod tip and guides.
- Flip the bail up to allow line to leave
- Finally, adjust the drag to 1/3 or 1/4 of your line’s pound test
And that’s it! You’ve set up your reel, and you’re now ready to cast. Before that though, let’s go over how to hold the rod the right way.
Gripping and Holding Your Fishing Rod
This may seem simple, but I wanted to make sure you’re doing every step right, so I’m going to break down even this simple step.
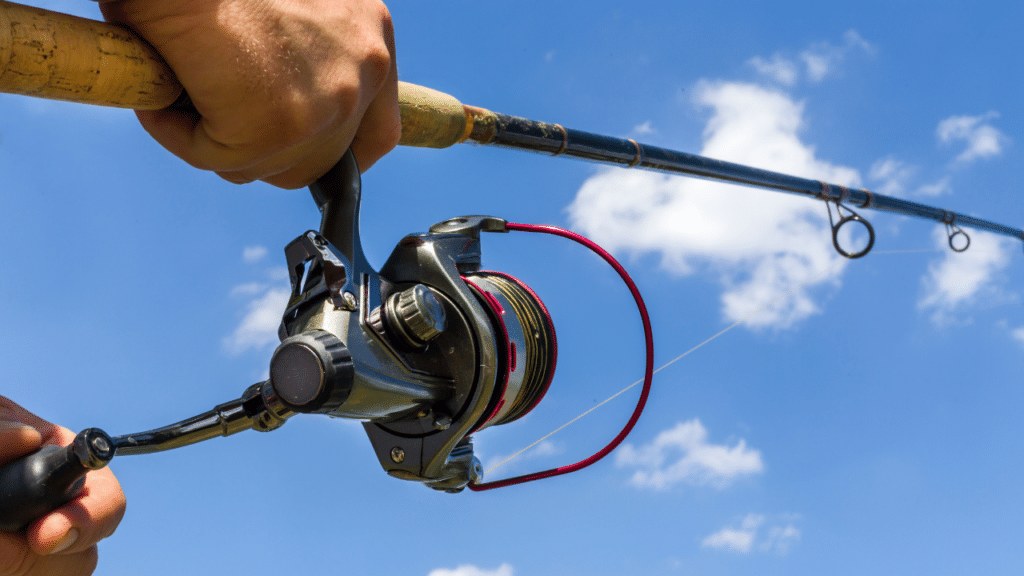
- Grab the rod handle with your dominant hand on top and your other hand near the butt (bottom). Your index finger should be above the reel and the other three fingers below, just like in the intro picture. The rod should also be pointing forward because afterward, you’ll need to fling it backward. It should be somewhat horizontal and parallel to the ground.
- Now, use the index finger to press or pinch the line against the rod. This little act of securing the grip will grant you extra control when casting.
- Finally, for your non-dominant hand, your grip should be more relaxed. The point is to provide stability and balance, acting as support when you cast, so there’s no need to grip too tightly.
Casting Techniques
Perfect. Your rod and reel are set up, and you’re in casting position. Now, let’s cast.
Here are the two different basic casting techniques you’ll need for different situations.
Overhead Cast
This is probably what you think of when I say cast, and generally allows you to cast the farthest. Here’s how you do it:
- Bring the forward back over your head. It should point almost upwards at the sky, but just a bit farther back.
- Then, cast it forward, almost like you’re throwing the lure or bait out. Make sure to release your index finger once your arm reaches the 45-degree angle. You can also try to aim for a particular spot if you’ve seen some action like ripples. Just note that it will take a bit of practice to get the hang of casting accurately.
- Once you see your lure or bait kiss the water, close that bail with your non-dominant hand.
- At this point, you’ll need to reel the line in just enough that it becomes taut. This will allow you to see any movement in the line.
- From here on, you can either wait for a bite or reel in the line to create your lure or bait’s desired action.
Sidearm Cast
This is exactly as it sounds, you’ll be casting from the side. This cast generally covers less distance, but allows you to avoid snagging on any overhead obstacles like trees or bridges. It also tends to be easier to cast accurately.
- For this cast, your starting position is with the rod still behind you, but not over your shoulder. Instead, it should be beside your arm and parallel, not vertical to the ground.
- You should also be standing sideways to your target, because you will quite literally be casting sideways, either from left to right or right to left.
- From here, just cast like you’re swinging a baseball bat. Swing and twist your hips and shoulders to achieve more distance. You should end up almost facing the target at the end of your cast.
- Then, repeat the same process as above. Close the bail, reel in line till taut, and then either wait or reel in the line for your desired action.
Post-Casting
Here comes the fun part, reeling in the fish. Once you feel that tug you’ve been anticipating, it’s time to battle the fish.
- Set the hook. You’ll need to embed the hook in the fish’s mouth, so give your rod a firm, swift rod pull either upwards or sideways. In normal situations, you should be setting the hook upwards. But if you’re fishing in dense cover such as weeds, setting upwards might result in entanglement, so a sideways hookset is ideal. This will also help move the fish away from the cover.
- Now, start reeling in the fish. Make sure to maintain consistent pressure on the line so that fish has no chance to break free. Don’t ever allow the line to go slack.
- In the event that the fish makes a sudden burst for it and overcomes your drag, let it run. Wait till you feel the fish start to tire out and the tension lessens, then continue to reel it in. Just note that if you feel the fish is running down too much line, this means the drag isn’t enough. Although it’s not recommended to adjust drag during a fight, you may have no choice but to gently tighten the drag. In the beginning, you may lose a fish, but over time, you’ll learn how to adjust the drag without losing your catch.
- Once you’ve reeled in the fish, you need to bring it out of the water. You can use a net, gaff, or even your hands, just make sure to wear fishing gloves. Fish scales can be sharp, and even for those that aren’t, hooks and fish teeth can seriously hurt your hands.
- To keep your fish fresh, consider storing it in a fishing cooler. This will ensure your fish stays fresh until you get home, especially if you plan to continue fishing and not head home immediately.
Conclusion
And there you have it, follow these steps and you’ll have a good foundation to start snagging fish!
A final tip before we end off is to dance with the fish, don’t fight it. I know we always say to “fight” the fish, but it’s really more of a tango. Move with the fish and guide it away from obstacles.
Experience is the best teacher, so don’t worry about making mistakes. The important thing is to go out there, have fun, and keep learning. Eventually, once you’ve masted the spinning reel, you can even move on to baitcaster reels!
And if you need any fishing gear whatsoever, chances are, we’ve got a guide on it here. Alternatively, if you’re just looking to learn how to catch fish, you can also check out our tips and guides. Now, go out there and start fishing!